Tuesday, 22 December 2015

SQL Server using Windows/Active Directory Groups

My experience working as an operational DBA is that a significant portion of time is spent on time consuming repetitive requests from the end users or necessary maintenance work like monitoring space usage and remedying issues with limited space.  

If the DBAs are lucky and are sent on training from time to time, they may have the opportunity to learn about interesting topics like performance tuning or troubleshooting performance issues.  My experience with this is that you can go off and learn all sorts of tips and tricks about performance optimization and get back to work with intentions of utilizing your new or refreshed skills and proactively tuning your environment.  However, you get back to work and the steady stream of day to day requests such as security provisioning returns and your best intentions once again have to take a back seat.

The topic of using Windows/AD groups for the purposes of SQL Server security is not only a security best practice that is recommended by Microsoft but also a very concrete action you can take to free up time to perform additional proactive operations that improve the SQL Server environment that you are responsible for. 

In this blog, Ill summarize just a couple benefits of using Windows/AD groups to make securing your SQL Server much more efficient and less labor intensive.

Anyone who has attained any level of SQL Server certification knows that learning the basics of SQL Server is required learning.  Two of the first things you learn about is the need for creating users and logins in SQL Server and time is spent learning the difference.  

In order to even connect to a SQL Server instance you need to have a login to authenticate your credentials.  That login is mapped to a user object and from there privileges and permissions are provisioned as necessary.  Sounds simple right? It is but it can get a lot more complicated due to the amount of work it would take to administer all of these objects if we created logins and user objects for each individual user and for each application context.

The basis of this blog is that Windows authentication should be used to leverage the security of a trusted domain in a Windows network environment.    Benefits also include being able to use the features such as password complexity and expiration requirements that are administered by the domain administrators. 

When defining a login it is good idea to use an Windows/AD group such as the following:

USE [master]
GO
CREATE LOGIN [DOMAIN\ADGroup] FROM WINDOWS 
WITH 
   DEFAULT_DATABASE=[Adventureworks2012];

Then you can create a user object for this login:

USE [Adventureworks2012] 
GO 
CREATE USER [DOMAIN\ADGroupFOR LOGIN [DOMAIN\ADGroup 
WITH DEFAULT_SCHEMA=[dbo]; 
EXEC sp_addrolemember N'db_datareader'N'DOMAIN\ADGroup';

A very real benefit from a security view is that now connection strings from applications to the SQL Server instance do not need to include vulnerable passwords.  If the domain is a trusted domain then a connection string such as the following will be much more secure.

"Driver={SQLServer};Server=SERVERNAME;Database=Adventureworks2012;Trusted_Connection=yes;"

The biggest time saving benefit is now when a new employee is hired or when an employee leaves, the domain administrator will just have to include or exclude them from the Windows/AD group and because the login is created with the Windows/AD group the user will automatically be included or excluded from the SQL Server security model.  No more adding or deleting individual logins and users and also the risk of creating orphaned users is reduced as well.

A lesser known benefit of using Windows/AD groups for logins is that the ability to audit on a granular level is not lost.  For example, a user is authenticated by signing on to their trusted domain.  The Windows/AD group is mapped to a login.  When a SQL Server user who is mapped to that login performs DDL or DML their actions are logged as their Windows account.  If you were to execute SP_WHO2 you would see their own personal Windows account ie: Domain\UserName.

This illustration shows the various level of security from a Windows level to a Database level.  


Example: Permissions Hierarchy (MSDN)

By creating a Windows/AD group and a server level role and a database level user the security model becomes very robust.

Thanks for reading,
SQLCANUCK

Friday, 4 December 2015

Transactions in SSIS

It could be argued that the number 1 reason why database products like SQL Server and Oracle are a viable solution to manage data is that the products possess certain properties that ensure data integrity.  This is accomplished by applying the characteristics of ACID properties and the use of transactions.

ACID stands for Atomicity, Consistency, Isolation, Durability.  I won’t be go into detail on these in this blog but Ill direct you to this msdn link for more information: https://msdn.microsoft.com/en-us/library/aa480356.aspx?f=255&MSPPError=-2147217396 .  

The use of transactions in dealing with data is vital to ensuring data integrity and as a DBA and SQL developer I have implemented transactions in T-SQL code to ensure data integrity.  SQL Server Integration Services also needs to use transactions for the same reasons.

The use of transactions to ensure the ACID properties are followed is fully supported in SSIS and this blog will deal with the SSIS options that make it possible.

When you study for and complete any Microsoft certification on SQL server you will be required to know all of the differences between the various Isolation Levels that SQL Server supports.  These isolation level control the behavior of transactions and levels of concurrency.  This type of behavior has a direct effect on the type of behavior one can expect to see when querying data in a multi-user environment.  I won’t go into detail on the various Isolation levels because it is very complex but I will direct you to this link for further explanation.   This link will also take you to a cute poster that Kendra Little created.  http://www.brentozar.com/isolation-levels-sql-server/ .


The SSIS properties I want to discuss in this blog are the Transaction Option properties. 


Example:  Transaction Option in Properties window in SSDT


The three possible options for this property are Supported, NotSupported and  Required.  
This property can be set in the properties window in SSDT.

Transaction Options

      Supported:   I’ll start with Supported because this is the default that is used when you create a new package in an SSIS project.   Supported means that the task or container does not start in a transaction but it will become part of a transaction if one exists.  This means that if a container is set to Supported is part of a package that is set to Required then the container will join the transaction of the parent package.
         
      Required:  This one is a bit easier to understand.  It simply means that the container will start a transaction.  However, if the container has a parent that already has a transaction then it will just join the transaction of the parent.  If the parent were set to Supported or Not Supported then this container would start a transaction of its own.
      
      NotSupported:  This option indicates that the container will not join an existing transaction nor will it start a transaction of its own.


Note:  It is important to note that the use of transactions in SSIS require that the MSDTC  (Distributed Transaction Coordinator) be running.  

If you try to implement transactions in SSIS and receive an error like the one below then you should check to see if the MSDTC  is running.

 
Example: Error you receive if the MSDTC is not running.

To start the MSDTC you can open the Control Panel and go to Administrative Tools and click on Services.  Locate Distributed Transaction Coordinator in the list of services and click on Start in the action menu.


Example: Distributed Transaction Coordinator in the Services snap-in.

Thanks for reading,

SQL CANUCK


Friday, 20 November 2015

Performance Considerations When Choosing Transformations in SSIS

The use of SQL Server Integration Services (SSIS) can help to save a lot of time when creating ETL solutions.  The graphical nature of the tool makes it very intuitive and easy to understand.  Often, a person can look at a SSIS ETL flow and understand at a glance what the intended purpose is.

I have been working with SSIS for several years now and I have realized that the easy to use graphical nature of the tool is very advantageous but it recently occurred to me that there is a disadvantage that I had not considered.  I have also been the recipient of formal training courses on the tool as well as completed formal exams on the subject.

When you select a transformation to use from the tool box, you select the transformation and drag it over to your data flow.  This could give the illusion that all transformations are created equally because they all come from the same tool box.  What is not immediately apparent is that there are significant differences between the performance behaviors of the transformations based on a few different properties of the objects.  

The properties I will discuss are the synchronous/asynchronous property and the transformation type property ie:  non-blocking, semi-blocking, fully-blocking.  The properties that an object possesses are a significant factor in the performance you can expect from the object.

Synchronous/Asynchronous

A synchronous transformation is the more highly performing type because the transformation uses the same buffer for the output as is used for the input.  The incoming rows are processed and passed on one row at a time and this is possible because the transformation does not need any additional information from other buffers.  MSDN uses the Data Conversion transformation as a perfect example of this.  Each row that is used as input from the buffer is converted and then outputted one row at a time.  Each conversion is completely separate from the rest of the row set so the process does not have to wait on anything else and can complete much faster.


Example: The Data Conversion transformation is synchronous.

An asynchronous transformation is the just the opposite of that.  Instead of relying on the same input buffer as the output buffer, the process may have to acquire multiple buffers before it can complete the necessary processing.  There may be some additional waiting involved.  The output buffer is not independent of the input buffer.   A perfect example of this is the Merge transformation.  Before the output buffer can be complete it has to first look at many rows from each of the input buffers and then completes the merge operation and return the row set in a sorted order.


Example: The Merge Conversion transformation is asynchronous.

It is interesting to note that all destination adapters are synchronous and all source adapters are asynchronous because they need 2 output buffers.  One for the success and one for any failed outputs.

Three Transformation Types
In this next section, Ill briefly discuss the three transformation type of non-blocking, semi-blocking, fully-blocking.

Non-Blocking
This transformation type is the best performing type.  They process row by row with no dependency on other rows.  The number of rows that are in the input buffer are equal to the rows that are in the output buffer.  The process is synchronous and therefore they are made available to the downstream output with no waiting on the status of other buffers.  This makes them very lightweight and efficient.  Row transformation are a good example of a non-blocking transformation.

Semi-Blocking
Semi-blocking transformation have dependence on other rows.  Rows are added to the input buffer and held for a while until the process is able to release the rows to the output buffer.  A good example of this is the Merge transformation.  Rows are added the input buffer and held until a match is found and then the rows are released to the output buffer in a sorted output.  The time taken before a match is found is what causes these types of transformation to perform worse than non-blocking transformations.

Fully-Blocking
A full-blocking transformation is the least performing transformation.  They require all rows to be received from the input buffer and held until they can be subjected to transformation.  The nature of the output is dependent on collecting all the rows first.  A perfect example of a fully-blocking transformation is an Aggregate transformation.  If you are going to SUM a row set it only makes sense that you collect the entire row set first before you can SUM it.

It is important to consider these properties when deciding which transformations to utilize.  A complete understanding of the difference in performance helps to make the best choice.


Example: Transformation Type Categories (Satya Katari)

Thanks for reading,

SQL Canuck

Friday, 13 November 2015

Using LOCALHOST to connect to a named SQL Server 2012 Instance

Apart from working on database servers that are part of a wide area network for most of my day to day duties as a Senior Data Warehouse Architect, I like to keep  local SQL Server instance(s) on my work PC.  This allows me to spend some time working through training demos that I come across or that are part of my self-paced learning objectives to prepare for passing certification exams.

I am about a week away from writing the first of 2 certification exams for the MCSA SQL Server 2012 certification.  In preparation for that, I am working through some material from Microsoft Press.  This material comes with excellent demos and these demos need to access to a named instance of SQL Server 2012.  I installed the developer edition of SQL Server 2012 on my PC and created an appropriate named instance.

For many years, I have kept various instances of SQL Server local to my PC so I could play in a secure environment.  I got in the habit of connecting to these instances by using the LOCALHOST hostname.  This allows me to access the network services that run on the host (my own PC) by using the loopback network interface.  I could type my computer name each time but this is just easier to type LOCALHOST or even the loopback IP 127.0.0.1 .

After I created my newest named instance, I noticed that I was having connection issues when I tried to connect using the LOCALHOST as my server name.  The same was true when I would try use the loopback IP address.  I would try to connect to SQL Server SSMS and if I used LOCALHOST or 127.0.0.1 as the server name it wouldn’t not connect and give me the following error.


Example: Connect to Server error message


After some investigation, I realized that because I was trying to connect to a named instance as opposed to a default instance there were a few steps I would need to take to continue to use LOCALHOST as my server name. 

If I wanted the hostname LOCALHOST to be associated with my newly installed named instance I would need to create an alias.  This can be done in the SQL Server Configuration Manager that is provided when you install SQL Server 2012.  This can found at Start>All Programs>Microsoft SQL Server 2012>Configuration Tools.  

Once the configuration manager is opened you can go to the node that is called SQL Native Client 11.0 Configuration (32bit).  You can right click and select New Alias and enter ‘LOCALHOST’ under Alias Name and your SERVERNAME/InstanceName under Server.  You should do the same on SQL Native Client 11.0 Configuration if your PC runs a 64 bit architecture.


Example: SQL Server Configuration Manager


Example: Add a new alias


Now you will find that you can connect to the database engine by using LOCALHOST as server name and because your alias points to a named instance you don’t even need to specify the \InstanceName as part of your server name when you connect to SSMS or SSIS etc.

It is important to also note that you can connect to a named instance using a loopback address as long as you also specify your instance name ie:  127.0.0.1\InstanceName and in this case an alias isn’t necessary.

The method I have described above is not a lot of work and if you are going to be doing a lot of work on a local named instance then being able to connect by using LOCALHOST instead of SERVERNAME\InstanceName is a convenient time saver


Thanks for reading,
SQL Canuck


Friday, 6 November 2015

Out of Date Statistics

This week a BI specialist came up to me and asked me to inspect a query that was not performing very well.  He knew that I have attended a week long Microsoft course called ‘SQL Server 2012: Performance Tuning- Design, Internals and Architecture’ so I have had the opportunity to help him out on a number of occasions for many performance based questions. 

He sent the query over and I ran it and inspected the actual query plan by pressing the ‘Include Actual Execution Plan’ button in SQL Server 2012 Management Studio.


(Example: Include Actual Execution Plan button)

The query was not very long or complicated so I was surprised when it took several minutes to return data.  When I inspected the query execution plan I didn’t notice anything that looked like it should be causing a long execution time.  Quite the opposite was true actually.

When I broke the query into chunks and ran each chunk individually the performance was fine until I introduced a specific table.  We will call it TableA.  I investigated the meta-data of TableA and discovered that it was a large table but it had appropriate indexes on it including a clustered b-tree index on a surrogate integer column. 

When I examined the query plan for that TableA, it indicated that it was using an Clustered Index Seek on with a Key Look up.  I was surprised to see this because this really is the ideal situation and is the best choice for highly selective queries.  It means that the optimizer has located an appropriate index.  The Clustered index seek means that the engine will not have to scan all the rows in the data pages to find what it is looking for.  It can traverse the b-tree index and in just a couple reads get right to the index key it is looking for.  It can then do a quick key look up and go right to the needed data.


(Example: Clustered Index Seek operator)


(Example: Key Lookup operator)

So this struck me as strange. If everything was so ideal then why was it taking so long?  If you guessed ‘Statistics’ then you are correct.  The first thing that came to mind was that the statistics may have been out of date for that index. 

I suggested that the developer identify the statistics associated with that index and see when it was last updated. 


(Example: Statistics node associated with the Products table)


(Example: Property page of a statistic object shows the last time they were updated.)

If the statistics were out of date then they should be updated by running a similar command to the following:
 
USE AdventureWorks2012;
GO
UPDATE STATISTICS Production.Product(Products)
    WITH FULLSCAN, NORECOMPUTE;
GO

'The following example updates the Products statistics in the Product table, forces a full scan of all rows in the Product table, and turns off automatic statistics for the Products statistics.'

The developer came back to me later that day and said he had updated the statistics and now the query was completing in just a few seconds.

Thanks for reading,

SQL Canuck

Friday, 30 October 2015

Fact Table Column Types

I promised last week to continue the discussion of the various column types that are found in dimension and fact tables.

I explained the types of columns found in dimension tables and that blog can be found here: (http://mssqlcanuck.blogspot.ca/2015/10/dimension-table-column-types.html).

I also have a previous blog about the basics of dimensional modelling and it helps to explain what dimension and fact tables are. (http://mssqlcanuck.blogspot.ca/2015/08/dimensional-modeling-concepts.html)

Fact tables are really what make the dimensional model so efficient and quick for reporting and data analytics because it contains granular measurements of important business processes.  The fact table combined with the dimension tables create an ideal environment for fast and accurate data analysis.

I mentioned in the blog about dimension column types that it can be over whelming to hear all the names of the data warehousing concepts such as lineage, slowly changing dimensions, surrogate keys, natural keys, composite keys, fact-less fact tables etc.  I’ve tried to break down these concepts into smaller blogs so they are easier to digest.

Fact Table Column Types

These are the types of columns you will find in a fact table.

Measure – This is the essence of a fact table and they store measurements associate with a specific business process.  They are usually numeric and can be aggregated.  Examples are sales amount, order quantity, discount amount.  These values can often be additive or semi-additive and when associated with relevant dimensions can be rolled up to represent aggregations at various granularity.

Foreign keys – These keys create a relationship between the dimension tables and the fact tables.  Without the relationship to dimension tables the measures would be meaningless.  I often use the example of 28kg of rice. 28 by itself is ambiguous but when you add kg (unit of measure dimension) and rice (product dimension) it becomes much more meaningful.  The fact table is on the many side of the relationship.   All the foreign keys in a fact table usually create a unique row in the fact table and can be considered a composite primary key. 

Surrogate key – Sometimes you will include a surrogate key to act as the primary key.  This key is usually the business key from the source table.  For performance reasons is best if the key is short and consists of only 1 or 2 columns and preferably numeric.  Often you could just use a collection of foreign keys that point to dimension tables to act as a composite primary key but this can be confusing and difficult to work with so sometimes it makes more sense to assign a surrogate key either from an identity or sequence database object or adopt one from the source system table.


Lineage columns – These columns are used for auditing purposes.  Typically in a data warehouse environment the ETL loads are run nightly.  You may want to keep track of which loads are successful or failed and also the load date so you know how current your data is in the warehouse or even which source system provided the data.  This is known as lineage data and is typically not exposed to the report consumer but is very helpful for the DBA or ETL developers.


Example:  FactSalesQuota fact table

Thanks for reading, 

SQL Canuck

Friday, 23 October 2015

Identify and Resolve Orphaned SQL Server Database Users

In my experience as a SQL Server DBA, I found myself spending a lot of time making sure that our backup/restore strategy was in tip top shape.  This involved spot checking backups and testing them on test servers to ensure that they were valid.  

I'm reminded of a couple old DBA saying such as "Your data is only as good as your last backup." and "Your backup is only as good as your last restore."  Testing that your backups will be useful in an disaster recovery situation is very important and essential for job preservation.

Also, as an operational support DBA for various LOB systems such as PeopleSoft and BizTalk, we would spend some time creating copy only backups and restoring them in test and development environments so the developers have a ‘refresh’ of test or development data.  

A possible by-product of moving databases around to various environments is that sometimes it can result in an orphaned user. 

An orphaned user is a user that has no corresponding SQL Server login.  When you create a login so that it can be authenticated against the SQL Server instance you will also create a user and then associate the two together. 

USE [AdventureWorks2012]
GO
CREATE USER "domain\user1" FOR LOGIN "domain\login1";
GO

If a SQL Server log in is dropped but the user is not then the user is orphaned. 

USE [AdventureWorks2012]
GO
Drop Login "domain\login1";
GO

It is prudent to clean up these orphaned  users from time to time to avoid confusion and for security reasons.  It can be very time consuming and brain numbing to manually try to traverse the database objects in SSMS and identify and delete users.  It would also be very risky because you could incorrectly identify and a user as orphaned and delete it and possibly cause serious problems.

There is a way to detect orphaned users in a database by running a system stored procedure.  The system stored procedure is called sp_change_users and has an option where you provide @Action = ‘Report’ as a parameter.

USE [AdventureWorks2012]
GO;
sp_change_users_login @Action='Report';
GO;

The command will return the following result set:


You can also use the sp_change_user_login stored procedure to then associate the orphaned database user to a SQL Server login that you choose.

You can read more about this system stored procedure at:


Thanks for reading,  

SQL Canuck

Thursday, 22 October 2015

Dimension Table Column Types

When you start to learn about BI and data warehousing it can be very daunting when you hear all the technical terms.  It is very easy to get over whelmed when hearing about conformed dimensions, junk dimensions, fact-less tables, slowly changing dimensions, semantic layer, MOLAP, ROLAP and HOLAP (I think you get the idea). 

It was my experience, coming from a traditional programmer/analyst back ground that used a relational model as a database back end, that most of these terms were unfamiliar.  The good news is that with a little effort and study it doesn’t take that long to get familiar with it all. 

A good way to get used to it all is to just break it down bit by bit and digest it slowly.  I have previous posts that describe the use of dimension and fact tables as the foundation of star and snow flake schemas (http://mssqlcanuck.blogspot.ca/2015/10/the-fact-less-facttable-every-noob-to.html and http://mssqlcanuck.blogspot.ca/2015/08/dimensional-modeling-concepts.html). 

I’ll use this post to briefly explain the types of columns that make up a typical dimension table.  I find that once you understand the columns types (and I don’t mean data types like nvarchar, numeric or int) then it is much easier to understand the bigger picture.

Dimension Table Column Types

Dimension tables really describe that facts they are related to.  For example, 16 could be the measure but it doesn't make sense if it isn’t related to a product dimension (RICE) or a unit of measure dimension (KGS).  

These are the types of columns you will find in a dimension table.

Key columns – You will need to be able to uniquely identify each row in a dimension table so you will need key columns. You can use natural keys from the source system or surrogate keys (http://www.kimballgroup.com/1998/05/surrogate-keys/).

Name columns – After you identify a row with a unique key, you will need to be able to refer to the entity with a name.  A report that only contains only keys won't read very well.  For example, you could have a row in a customer dimension that has a key value but you will also want to have a human name to refer to the customer. 

Attribute columns – This column is very important for performing BI analysis.  Quite often in data analytics you will want to create pivot reports on discrete values such as gender or year.  Columns in dimension tables that are discrete and make good candidates to perform pivot tables or graphs are called attribute columns.

Member properties – It wouldn’t make sense to pivot on something like a customer’s address because there would be way too many of them.  However, things like addresses are important to provide additional information on a report.  Columns like address are called member properties and are useful as labels on a report.  It makes sense from a performance stand point to include these types of columns in a dimension table to avoid having to use distributed queries to the source system to get the information.

Lineage columns – These types of columns are used for auditing purposes.  Typically in a data 
warehouse environment the ETL loads are run nightly.  You may want to keep track of which loads are successful or fail and also the load date so you know how current your data is in the warehouse or even which source system provided the data.  This is known as lineage data and is typically not exposed to the report consumer but is very helpful for the DBA and ETL developers.


Example: Customer dimension table 

I’ll do a similar post next week to describe the types of columns you will find on a fact table.
Thanks for reading,


SQL Canuck

Friday, 16 October 2015

UNION ALL and MERGE in SSIS

Recently, I  needed to combine the results of two different queries into one existing dim table.  Our third party vendor changed the way they performed a business requirement.  Our existing SSIS ETL processes had already loaded data into the data warehouse based on the ‘old’ way of doing things but because now there was a new way of doing the same thing we needed to enhance our ETL to take into account the ‘new’ way and load the data into the same existing dim table.

I was able to write a SQL query that used a UNION ALL statement that would combine the old and new way of doing things and I could have put that SQL query into a simple Execute SQL Task control flow but it made more sense to represent the combination of the two queries in a graphic fashion so that the flow was more self-documenting and made more sense to the next person who has to deal with it.

I would put the old query in one OLE DB Source and the new query in another OLE DB Source and then combine them into one destination.  It was easy enough to create the top two sources but when it came time to make the center combination of the two sources I realized there were two options.  I could use the MERGE transformation or the UNION ALL transformation.


Example:  Union All Transformation


Example:  Merge Transformation


I have worked as a Data Warehouse Architect for several years and I have had the opportunity to use the MERGE transformation before but I have not worked with the UNION ALL in a while and I needed to remind myself what was the difference of the two since they appeared so similar.

After some research, it is really quite simple. 

There are only 3 main differences between them.
  1.        Union All will output unsorted data so does not require sorted inputs. 
  2.        Merge requires sorted inputs and will output sorted data.
  3.        Merge can only use 2 inputs.  Union All can accept multiple inputs.


It is quite obvious from the list above that most significant item is how Merge can only use 2 inputs.  
If you have more than 2 inputs that you need to combine then you must use Union All.  

Union All is nicer to work with because you don’t have to mess around with ensuring the inputs are sorted which can require a SORT transformation or just having a SORT clause in your sql query.  

Merge can be very fussy about how you set advanced properties such as IsSorted and SortKey position.

An important similarity between the two transformation is that both require the inputs and outputs to have identical metadata such as compatible data types.

In the end the results are identical so take case to know the differences and choose carefully depending on the nature of you goal.


Thanks for reading,   SQL Canuck

Monday, 5 October 2015

The ‘Fact-less’ Fact Table

The ‘Fact-less’ Fact Table

Every ‘noob’ to data warehousing is aware of the simple concepts of classic star schema model.  

I have a previous blog that describes it found here:


In some of my recent research for other blog entries I came across a term that I have read about in the past but haven’t come seen in a while.  I think terms like this come up when we as data professionals study the true concepts and theory of a subject but in our day to day work life they don’t come up as often.  I’m speaking of the term ‘fact-less fact’ table.

Just as a review, we know the fact table as the table in the middle of the star schema that contains the measurable numeric fields as well as a series of foreign keys that point to the qualifying dimension tables.  This allows us to roll up numeric additive values and relate them to other entities that give the aggregation a context that makes sense.  For example:  ‘28’ by itself doesn’t mean much but when you say ’28 kg of rice’ it makes a lot more sense.  You are applying the dimensions of ‘unit of measure’ (kg) and ‘product’ (rice) to the fact field aggregate of ‘28’.

So what does all this have to do with a fact-less fact table?  

A fact-less fact table is really just an intersection of dimensions.  It contains none of the familiar additive numeric fields we are accustomed to seeing in a fact table.  It consists only of foreign keys that point to dimension tables.  It represents a many to many relationship between dimensions.

The classic example is that of a student information system that tracks attendance.  Imagine a fact table called Student_Attendance and dimension tables called Date, Student, Location, Teacher and Class.  


The event of a student attending a class doesn’t really need a recorded numeric representation in the fact table.  Just by merit of a fact table containing foreign keys from the fact table to the dimension tables means that the student did attend the particular class on that particular day at that particular location.  It just isn’t necessary to record a ‘1’ to represent the event.   To record the numeric additive field would just increase the size of the fact table for no good reason.

Thanks for reading, 


SQL Canuck

Tuesday, 22 September 2015

Data Warehouse Fact Tables and Column Store Indexes


In modern distributed database environments, it has become clear that the weak link, from a performance stand point, is the IO subsystem.  RAM and CPU speeds and reached impressive performance levels but the data access levels have not kept up with those of RAM or CPU.  

This represents a real problem for users of databases and a lost opportunity to keep database management systems, as we know them, a viable tool in a world of exponential data growth.  People simply will not put up with less than optimal performance in today’s fast pace digital world.

The engineers at Microsoft recognized this and introduced the column store index.  The column store index has proven to be incredibly fast for a high percentage of data warehouse queries specifically those targeting large fact tables which are where all the juicy meat is in a data warehouse.

Row Store and Column Store

A traditional B-tree structure in clustered and non-clustered indexes is based on a physical layout of data called a row store.  Simply put data is stored in data pages in your standard spreadsheet type of rows.  A column store turns this all on its head and stores data in a column oriented layout. 

Here is a simple graphic of the differences: (thank you http://arxtecture.com/ for this graphic)


Read what you need

This all seems like a simple enough concept but when you examine what this difference in physical layout really means performance it is actually quite amazing.

If you are querying only a subset of the data from a table and you specify the individual columns then you pull out only the requested data into memory and leave the rest behind.  This is a huge IO savings.

Compression

Also, Microsoft used a very aggressive compression technology from Vertipaq and this technology is hugely effective when using a column based physical layout.  For example:  suppose you have a column such as gender and you only have a handful of possible values.  This type of column that has very low selectivity is an ideal candidate for a high degree of compression.  If you had a fact table with many rows like this and you applied a highly aggressive compression ratio to it you again are decreasing the IO and increasing the performance times.

Ideal for data warehouse fact tables

In today’s modern data warehouses that use traditional star and snow flake schemas, it is not uncommon for fact tables to be incredibly large.  In order to provide a high level of aggregation of the more granular fact details, queries against fact tables are usually range based and implement a lot of scanning, sorting and aggregating of the data.  If the data is stored in a column based physical layout then the savings of IO that come from there being more necessary data per page read into memory, more efficient levels of compression and better memory buffer usage really begins to add up fast.  These benefits combined with the new batch model that the query optimizer offers can increase performance by up to 10x and sometimes up to 100x according to a Microsoft white paper called ‘Enhancements to SQL Server Column Stores.’

There are of course limitations and best practices that should be considered as well so be sure to look into those before you go changing all your indexes into column store indexes.

Thanks for reading,


SQL Canuck

Thursday, 17 September 2015

The Executioner - how is a deadlock victim chosen?

As database professionals we have all read at least a little bit about locks that the database engine uses.  The word locks in database engines have sort of become a swear word but unfairly.  Maybe because locks sounds like blocks we tend to think of locks as a bad thing when really it isn’t.  It is locks that ensure that our data remains consistent which of course is the C in A-C-I-D which of course is essential in ensuring an RDBMS is a viable solution.

The purpose of this blog is not to once again go over all the types of locks because there is plenty of material out there for that but to talk about something that I never really thought about much in the past.  This has to do with the dreaded deadlock.  Again, as database professionals, Im sure we have all seen the classic example of the deadlock.

Ill go over it quickly so we are all on the same page:
  • Transaction 1 gets a shared lock on a row.  
  • Transaction 2 gets a shared lock on a different row.
  • Transaction 1 asks for an exclusive lock on the other row but is blocked by the shared lock that Transaction 2 has on it.
  • Transaction 2 ask for an exclusive lock on the other row but is blocked by the shared lock that Transaction 1 has on it
  •  Transaction 1 can’t finish until Transaction 2 finishes but  Transaction 2 can’t finish because it is blocked by Transaction 1. 


-Technet


Now the reason I have chosen this topic is because recently an SSIS project that I support failed over night and when I examined the All Executions report found in the Information Services Catalogs node of SSMS, I discovered from the error messages that my package had been the victim of a deadlock that was detected.  The error message goes like this: 

Fix : Error 1205 : Transaction (Process ID) was deadlocked on resources with another process and has been chosen as the deadlock victim. Rerun the transaction.

I’d never really given it much thought about how it had been chosen as a victim but having recently passed my Oracle Certified Associate certification, I had read a lot about all the various processes that run in an Oracle instance and perform a variety of jobs.  So it occurred to me that there must be a similar type of process that is running automatically in Sql Server that handles deadlock situations so I did a quick google and looked it up.

There is indeed a dedicated thread that performs deadlock detection. 

The following is from Technet:

'Deadlock detection is performed by a lock monitor thread that periodically initiates a search through all of the tasks in an instance of the Database Engine. The following points describe the search process:
  • The default interval is 5 seconds.
  • If the lock monitor thread finds deadlocks, the deadlock detection interval will drop from 5 seconds to as low as 100 milliseconds depending on the frequency of deadlocks.
  • If the lock monitor thread stops finding deadlocks, the Database Engine increases the intervals between searches to 5 seconds.
  • If a deadlock has just been detected, it is assumed that the next threads that must wait for a lock are entering the deadlock cycle. The first couple of lock waits after a deadlock has been detected will immediately trigger a deadlock search rather than wait for the next deadlock detection interval. For example, if the current interval is 5 seconds, and a deadlock was just detected, the next lock wait will kick off the deadlock detector immediately. If this lock wait is part of a deadlock, it will be detected right away rather than during next deadlock search.

By default, the Database Engine chooses as the deadlock victim the session running the transaction that is least expensive to roll back. Alternatively, a user can specify the priority of sessions in a deadlock situation using the SET DEADLOCK_PRIORITY statement. DEADLOCK_PRIORITY can be set to LOW, NORMAL, or HIGH, or alternatively can be set to any integer value in the range (-10 to 10). The deadlock priority defaults to NORMAL.'

So if you are the victim of a deadlock anytime soon you will know you aren't being picked on because Sql Server just doesn't like you but there is a good reason for it and it wasn't just an unfair random occurrence.

Thanks for reading,


SQL Canuck

Tuesday, 8 September 2015

Resource Governor - learn it FULLY before you use it or suffer possible consequences.

Throughout many of my blog posts I talk about how I feel putting in the time to fully study certification material really pays off by filling out the breadth of your knowledge of the SQL Server products.  I came across a situation recently that really demonstrated this and I would like to share it with you.

It is easy as IT professionals to jump to conclusions about the functionality of areas of the product when in fact it may not be as intuitive as you may think. 

Recently, we came across a situation where our test environment was really struggling to perform.  We thought maybe it was because of the concurrent workloads we were asking it to handle but that didn’t really make sense since in the past it handled many different volumes with no problem.

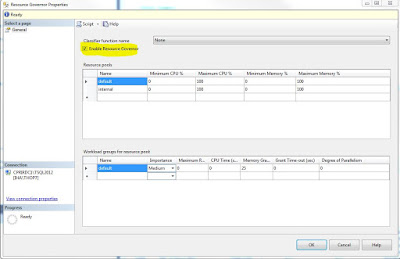
After some investigation, it was discovered that an erroneously configured Resource Governor set up was the culprit.  Resource Governor is a simple enough concept but there a few different components that must be setup properly.  It needs a resource pool, a workload group and a workload classifier function to all be set up correctly or the outcome can be very serious if you are unnecessarily throttling CPU or RAM or both.

Let me explain what happened.  An ETL developer suggested a Resource Governor set up so that when they run a job that rebuilds indexes they won’t hog the resources from the other ETL developers. That was a kind innocent enough gesture.  

So the first thing the sysadmin did was to enable  Resource Governor which makes sense.


Then they thought that if they set the Maximum CPU to 50% on the default resource pool for a limited amount of time, the developer could rebuild the indexes without hogging all the resources.


I believe the thinking was it was not possible to build a classifier function for some reason for this purpose so if they set the default to 50% for a limited time and then when they were done to return the system to normal.

When the developer was finished the rebuilding the sysadmin went in and clicked on the ‘Enable Resource Governor’ check box  to disable it thereby returning the system to how they found it.

So to summarize, the thought was if they enabled Resource Governor and lowered the default CPU to 50% and then later disabled the Resource Governor it would return the CPU to 100%. 

What they discovered, weeks later full of frustration at the decreased performance of the test server, was that disabling Resource Governor without setting the default CPU back to 100% would effectively limit all users of resources in the system to only 50%.  Simply disabling Resource Governor may not do what you think it does.  It isn’t quite that simple.

My point is that if they read more material about how Resource Governor really works and the importance of correctly using all the components together including a classifier function and also what the ‘default’ resource pool really is, then perhaps weeks of frustration could have been avoided.

Of course, I have the benefit of hindsight...:)  

Thanks for reading,


SQL Canuck

Monday, 31 August 2015

Identity Functions

Over several years of working with RDBMS products like MS SQL Server (since 2000) and Oracle 11g, there are times when really simple concepts are so darn confusing for whatever reason.  I imagine that it really depends on the person about what they find confusing but for me the proper use of @@IDENTITY and SCOPE_IDENTITY() and IDENT_CURRENT() always causes me pause. 

My work as a .NET developer and DBA and Data Warehouse Architect has required extensive use of this code and it seems that regardless of the type of database work you do it is very important to have a solid grip on what the differences really are.

There are many advantages to being certified in multiple version of SQL Server but what I consider one of the disadvantages of studying towards multiple certifications on different versions is having to review some of the more simple concepts over and over.  For example, an INT data type was the same in 2008 when I started studying towards my MCTS in SQL Server 2005 and it is the same today.   

Luckily studying some of the same concepts repeatedly really serves as a refresher.  This is one of those things that no matter how many times I go over it I can’t help but enjoy confirming the difference between the three pieces of code.

It really boils down to scope being the main difference.  I’ll assume we all know what an IDENTITY is.  It is just a property of a table column that is very helpful in creating key values in an easy and predictable way.  

When we insert into a table that contains a column that has a primary key that is defined as an Identity then we don’t need to tell it what value to be.  The identity property does it for us.

Now when we are coding sql stored procs or functions there are times when we need to know more information about the identity values that are used when inserting rows into tables.  That is where @@IDENTITY, SCOPE_IDENTITY() and IDENT_CURRENT() come in handy.

IDENT_CURRENT()
The one that I find easies to remember is IDENT_CURRENT() function.  If we pass it a the name of a table such as IDENT_CURRENT(‘Sales.Product’) then it will tell us the last identity value that was given to that table.
Now this is where it starts to get a bit more confusing J.

@@IDENTITY
This one returns the most recent identity value given to a database engine connection and it doesn’t care about the table or even the scope.  

SCOPE_IDENTITY()
This one returns the most recent identity value given to a database engine connection but it does care about the scope of the statement but still doesn’t care about the table.

Still confused?
Let’s look at some simple code to help make it more clear.

Ill first define a table called IdentitySample with an identity column called ID.

CREATE TABLE dbo.IdentitySample
(
Id INT NOT NULL IDENTITY(1, 1)
CONSTRAINT PK_ID PRIMARY KEY,
ProductId INT NOT NULL,
SampleDate DATE NOT NULL
);

If I insert some sample data into a sample table as such.

INSERT INTO dbo.IdentitySample(ProductId, SampleDate) VALUES
(1, '20150502'),
(1, '20150603'),
(2, '20150708');

Then view the data.

Id            ProductId            SampleDate
1              1                              20150502
2              1                              20150603
3              2                              20150708

Now if I call three of the identity columns discussed in the same session that I ran the last insert in I get the following.

SELECT
IDENT_CURRENT(‘dbo.IdentitySample’) as A,
@@IDENTITY as B ,
SCOPE_IDENTITY() as C;


I get the following:
A             B             C
3              3              3
They all have the same value which is the last identity value assigned to the dbo.IndentitySample table.

If I were to open another window and rerun the same statement I would get the following.
A             B             C
NULL     NULL     3

This is because for the scope of this newly opened connection there has been no identity values issued but the last identity issued to the dbo.IdentitySample is still 3.


Now if you were using a stored proc to insert a row and a new identity value was assigned then the SCOPE_IDENTITY() function will return value that that stored proc created.   

Now if the stored proc were to call a different stored proc (out of scope) then @@IDENTITY would return the value of the by that stored proc regardless of the table or the scope of the statement that created the identity.

Thanks for reading, 
SQL Canuck

You can read more about this at 
https://msdn.microsoft.com/en-CA/library/ms187342.aspx